Installation and Service Manual
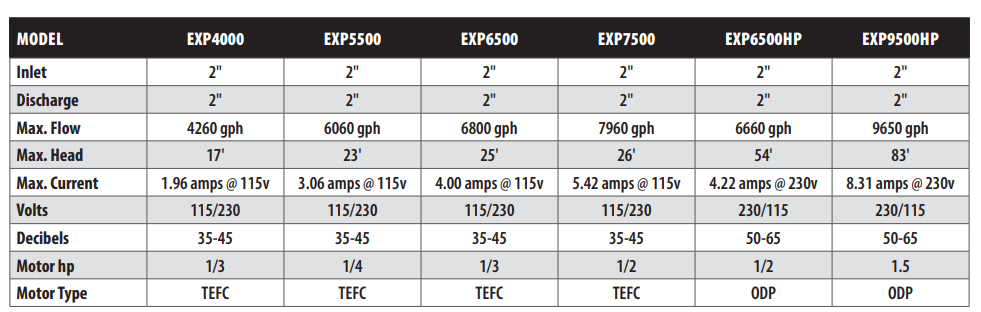
for EXP4000, EXP5500, EXP6500, EXP7500, EXP6500HP, EXP9500HP
WARNING: Please read completely before you install or operate your new pump!
This is an external “out-of-pond” pump! It is NOT submersible! Do NOT allow this pump to become submerged! Never run dry!
IMPORTANT SAFETY INSTRUCTIONS
Please read all instructions completely before installing or operating the pump. Save this manual for future reference regarding installation, operation, maintenance and troubleshooting of this pump. Please carefully read and follow all safety instructions and procedures listed on the pump and in this manual.
GENERAL WARNINGS
- This pump and motor unit should be installed by a qualified electrician or service person in accordance
with all applicable state and local codes and ordinances, and in accordance with the National Electrical
Code. Improper installation may create a mechanical or electrical hazard which could cause damage
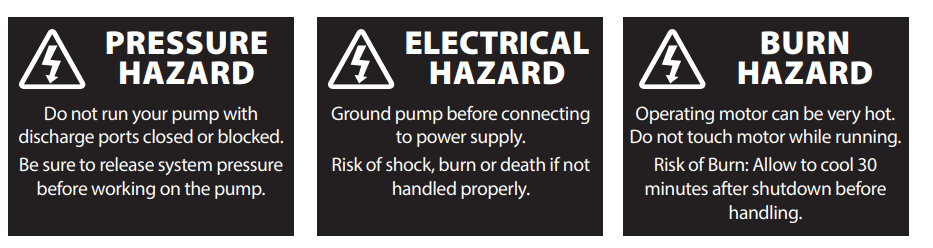
to property and could result in serious injury or death. - In order to avoid serious injury or death, always disconnect power to the motor before servicing
the pump and follow all instructions in this manual. - Always use the schematic on the motor for all electrical connections.
- Never run the pump dry. The priming pot must be filled with water and lid secured before starting
the motor. Running dry will void the warranty and can result in permanent damage to the pump unit. - To prevent incorrect motor rotation, install a ball or swing type check valve.
Do not use spring check valves. - Maintain a minimum flow rate of at least two gallons per minute to avoid damage to the pump unit.
- Visually inspect the pump and motor a minimum of once per week. If any leakage between the motor
and pump housing is present, replace the mechanical seal . The seal faces wear similar to car tires
and must be replaced periodically. For critical applications, replace the mechanical seal yearly. If pump
is excessively noisy, shut it down and contact support. - In freezing environments it is advisable to winterize your pump to prevent damage. Do not allow pump
or system plumbing to freeze, as freezing can cause damage that may lead to equipment failure or
possible injury and will void the warranty.
Scan the QR code at the bottom of page 3 or visit www.easypro.com/exp-series-pumps for pump winterization tips
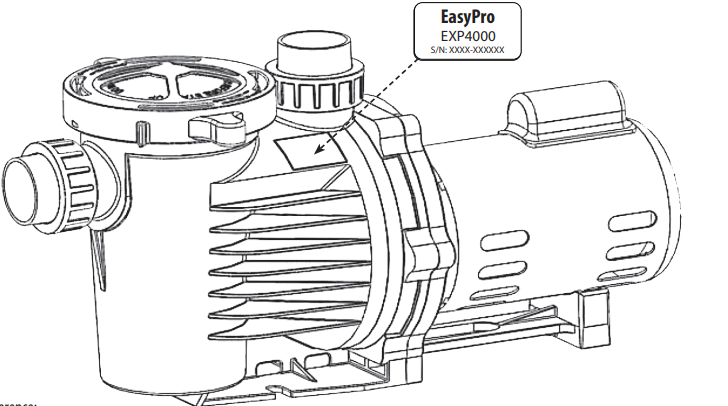
SELF-PRIMING EXTERNAL PUMPS
We congratulate you on your choice of the EXP Self Priming Pump! It has been carefully designed using the advantages of today’s technology and carefully constructed to give you the dependability of yesterday. To insure proper performance, we urge you to carefully follow the instructions in this manual. If you have any questions, call your nearest distributor or EasyPro for assistance.
INSTALLATION
- After thorough inspection, carefully remove the pump from the box.
- Secure the pump on a solid, flat foundation. A covered location is always best and care should be taken to ensure adequate ventilation.
NOTE: Make sure your installation location is no higher than 9 feet above the water surface level.
Scan the QR code at the bottom of the page or visit www.easypro.com/exp-series-pumps for more installation tips. - Install a ball or swing-type check valve as needed to facilitate pump disconnection, flow control and servicing.
- Connect plumbing to the pump by dry fit testing first to ensure proper fit and proper pipe alignment. Be sure the union nut is on the union
tailpiece before gluing in place. - Once proper fit and alignment is established, use proper pipe sealant designed for plastic pipes. Support plumbing as needed to prevent strain and damage. DO NOT overtighten the nut included with the pump in the quick connect fittings. Hand tightening is sufficient.
NOTE: If changing motor voltage, it is recommended that wiring be performed by a licensed electrician. Wiring of this pump should be in accordance with the wiring diagram located on the motor. Ensure the pump is wired for the correct supply voltage and is supplied by no smaller than 16 gauge wire and should be based on horsepower. The circuit breaker should be 20 to 30 amps.
If your pump will be hardwired: Be sure to ground the motor correctly by connecting code compliant wiring to the green grounding screw located under the wiring plate.
Scan the QR code at the bottom of the page or visit www.easypro.com/exp-series-pumps for electrical wiring instructions and tips. - When wiring is complete, double check the intake and discharge fittings to ensure a snug fit.
- Open the volute (strainer pot) lid and fill with water, ensure the lid O-ring is clean of any debris and close the lid securely prior to starting.
- Once the priming pot is filled and supply valves (if present) are opened, your pump is now ready to prime. Turn the motor on by plugging the unit in or switching on the power supply. Priming will vary in length. Water should continue to flow into the basket as the pump goes through the priming process. The priming process should not take longer than 15 minutes. The pump should never run dry. If water stops flowing into the strainer pot, shut the pump off immediately and review the troubleshooting tips on page 7.
NOTE: There may be installations in which plumbing allows for trapped air in the system. If this happens, priming will be difficult. In this case, loosen the discharge fittings slightly to allow trapped air to bleed off. Once primed, tighten the discharge fitting.
Scan the QR code at the bottom of the page or visit www.easypro.com/exp-series-pumps for more information on understanding priming and pump operation.
PUMP PARTS
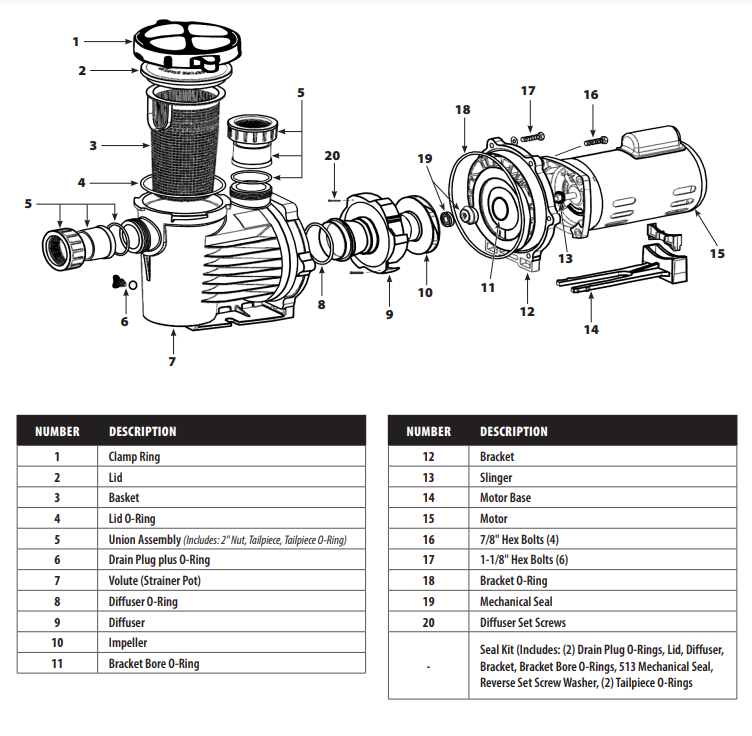
PUMP DISASSEMBLY
All moving parts are located in the rear sub-assembly of this pump. Tools required: 3/32″ Allen wrench • 7/16″ open end wrench • 9/16″ open end wrench • Small and large flathead screwdrivers • #3 Phillips screw driver
Disassembly and repair of the motor sub-assembly can be made as follows:
- Disconnect the pump from the power source by unplugging or turn off at the circuit breaker.
- Close all necessary valves on inlet and discharge lines and drain the pump by removing both drain plugs.
- Loosen and remove the six (6) 1-1/8” hex bolts that hold the volute and the bracket together.
- Pull the rear sub-assembly away from the volute. The volute may remain attached to the plumbing.
- Loosen and remove the two (2) diffuser set screws that hold the diffuser to the bracket.
- Remove the set screw from the impeller eye, if present. To remove, hold the impeller stationary and turn the set screw clockwise
to loosen (screw is left-hand threaded). - Hold the motor shaft stationary by removing the cap on the opposite end of the motor and inserting a screw driver in the slot, or a wrench on the flat spot on the motor shaft depending on the motor design and unscrew the impeller by turning it counter clockwise.
- Loosen and remove the four (4) 7/8” hex-bolts that hold the bracket to the motor face.
- To remove the shaft seal, place the bracket face down on a flat surface and press out the carbon/spring seal from the back side. Never pry it out from the front. Carefully remove the ceramic seal from the back of the impeller hub by carefully prying up with a small flathead screw driver.
- Clean the bracket, seal bore housing and the motor shaft as necessary. Remove slinger if replacing bearings
PUMP ASSEMBLY / PARTS REPLACEMENT
- To install a new shaft seal, clean or replace the bracket bore O-ring. Moisten bracket bore O-ring with water prior to installing to prevent rolling.
- Press the seal into the bore without touching or putting pressure on the delicate carbon face by pushing on the stainless steel collar. (A large socket or pipe nipple may be used to facilitate installation.)
- Clean as necessary the impeller hub and press in the ceramic part, making sure the polished white ceramic face is sitting flat and is facing out and not the rubber boot. NOTE: Handle the mechanical seal with care to protect the polished and lapped faces of the seam from damage.
Tip: Moistening the rubber boot with water prior to installation aids in proper seating. - Install the slinger rubber washer on the motor shaft. Install the bracket to the motor. Install and tighten the four (4) 7/8” hex bolts.
- Screw the impeller clockwise onto the motor shaft while holding the motor shaft stationary until it makes firm contact.
- Mount the diffuser onto the bracket fitting the plastic pins into the holes in the bracket, then tighten both diffuser set screws.
- Make sure the diffuser O-ring and bracket gasket are clean and properly seated.
- Assemble the motor sub-assembly to the volute using the six (6) 1-1/8” hex bolts. Do not tighten until all six (6) hex bolts are in place and hand tightened, then tighten all six (6) bolts uniformly in an alternating opposing sides pattern.
- Insert both drain plugs with O-rings installed and tighten. Install strainer basket and fill the volute (strainer pot) with water.
- Reinstall the lid and clamp ring, turning clockwise until snug.
- Open all valves on the system, if present, and reconnect the power to start. Wait for the pump to prime. Monitor water level in the volute basket area to ensure water is always present. If the pump has been running with no incoming water flow for more than 15 minutes, shut the system off immediately and call 800-448-3873 or email info@easypro.com for technical assistance.
MAINTENANCE
Cleaning the basket:
The strainer basket in the volute should be inspected and cleaned at least one (1) time per week, more often if excessive debris
is present in the operating environment.
- Turn off your pump and disconnect from the electrical source by unplugging or turning off the breaker.
- If you have a ball valve placed at the return side of your pump, be sure to close the valve to prevent backflow.
- Remove the black clamp ring by holding the tabs and turning the clamp ring counter clockwise. Take care if the clamp ring is too tight. Slightly bumping the tabs may aid in releasing the grip. Remove the lid and clean out the basket. It is recommended to clean out the basket using a sprayer on a garden hose and a brush as needed. Do not hit the basket on any hard surface as this will weaken and damage the basket.
- Reinstall the basket so that the tab under the basket locks in place.
- Fill volute (basket section) with water.
- Replace the lid securely.
- Open ball valve (if present).
- Connect power and start the pump.
WARNING: If the pump has been running with no incoming water flow for more than three (3) mintues, it is
important to IMMEDIATELY turn the pump off by disconnecting the unit from the power supply. If the volute
(main pump housing) is hot, allow the pump a minimum of one hour or more to cool before opening the lid.
The volute housing (strainer pot) should be cool to the touch before opening.
DANGER OF BURNS COULD OCCUR IF OPENED WHEN STILL HOT.
Seals and Bearings:
The strainer basket in the volute should be inspected and cleaned at least one (1) time per week, more often if excessive debris is present in the operating environment.
Pump seals and bearings experience normal wear and degrade over time. It is recommended to change pump seals every three (3) to four (4) years for fresh water applications and every year for salt water applications. The frequency of replacement will be determinate upon environment and water quality. If leakage is noticed at anytime, check troubleshooting tips and contact us for parts and advice. If the pump becomes abnormally noisy, this could be a sign that the bearings are failing and need replacement. There are a few options for repair when this occurs.
- If the pump is still under warranty, contact EasyPro Pond Products to obtain a return authorization and ship the pump to us for repair.
- Contact an electric motor repair center near you. Note that this option may not honor any warranty but may provide a good alternative.
- If you are mechanically minded, the option to order bearings and a seal kit from EasyPro Pond Products is available.
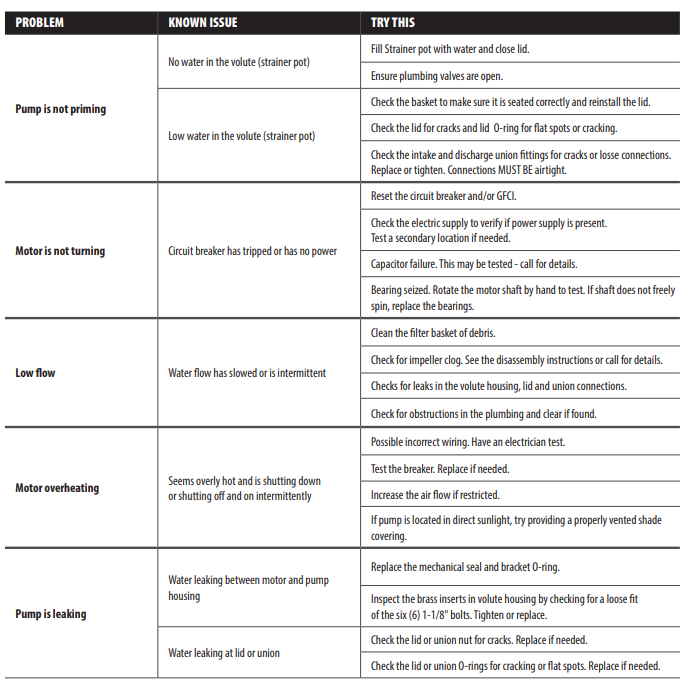
TROUBLESHOOTING
LIMITED WARRANTY
EasyPro Pond Products (“EasyPro”) warrants to the purchaser that this product (“Product”) will be free from any mechanical or material defects for a period of 3 years from the date of purchase. EasyPro specifically does not guarantee chemical compatibility, and expressly does not warrant units from any problems caused by chemical attack or failure due to incompatibility of fluid being pumped with pump materials of construction. This warranty only covers properly installed and maintained Products sold by authorized EasyPro Sellers who are subject to and follow EasyPro’s quality control standards.
Please note that because EasyPro is unable to control the quality of Products sold by unauthorized sellers, unless otherwise prohibited by law, this warranty does not cover Products purchased from unauthorized sellers.
This warranty does not cover normal wear and tear, nor any deterioration suffered through overloading, improper use, negligence, improper installation, acts of God or accident. If the motor is damaged by dirt, moisture, foreign mattre or corrosion it is not covered by the warranty.
Similarly, any modification made by the purchaser to the Product will cause the warranty to be null and void. This warranty does not cover any cost associated with the installation or removal of the Product subject to a warranty claim.
All returned items will be inspected to determine cause of failure before a warranty claim is approved.
The exclusive remedies provided hereunder shall, upon EasyPro’s inspection and option, be either repair or replacement of the Product or parts covered under this warranty.
Making a Claim: A Return Authorization (“RA”) number must first be obtained by calling EasyPro at 800-448-3873 or via email at warranty@easypro.com. It is the purchaser’s responsibility to pay the return shipping charges. Be sure to include the RA number, original receipt (in the form of an invoice or sales receipt), your name, your return address and your phone number inside of the package. No warranty claims will be honored without the original receipt that shows that your purchase was made from an Authorized EasyPro Seller. Ensure the product is properly packaged and insured for the replacement value.
Damage due to improper packaging is the responsibility of the sender.
ALL OTHER EXPRESS OR IMPLIED WARRANTIES INCLUDING MERCHANTABILITY OF FITNESS FOR A PARTICULAR PURPOSE ARE HEREBY LIMITED IN DURATION TO THE DURATION OF THE WARRANTY AS DESCRIBED ABOVE. Some States do not allow limitations on how long an implied warranty lasts, so the above limitations may not apply to you.
EasyPro shall not be held liable for any damages caused by defective components or materials of this Product; or for loss incurred because of the interruption of service; or any consequential/incidental damages and expenses arising from the production, sale, use or misuse of this Product. Some States do not allow the exclusion or limitation of incidental or consequential damages, so the above limitation or exclusion may not apply to you.
EasyPro shall not be held liable for any loss of fish, plants or any other livestock as a result of any failure or defect of this Product. This warranty gives you specific legal rights, and you may also have other rights that vary from State to State.