General Installation Tips
for EXP4000, EXP5500, EXP6500, EXP7500, EXP6500HP, EXP9500HP
Before Installation
Open the pump box when received and inspect for evidence of rough handling or damage to the pump and verify the product ordered. If damage is found, notify the freight carrier and contact the vendor purchased from immediately. For order discrepancies, contact the dealer purchased from immediately. Be sure your installation location is no higher than 9 feet above the water surface level. If using smaller than 2” pipe, excessive fittings such as elbows, sweeps or reducers, using an excessively long pipe run, using additional strainers or any other water flow restriction device, can increase the prime cycle time and reduce flow.
GENERAL INSTALLATION TIPS
- Position the pump as near to the water and as low as is practical. This will help reduce priming time, avoid cavitation, and maximize
your pumps performance. - Minimize friction loss by using the appropriate diameter pipe determined by gallons per minute flow, reducing run length, and minimizing
the number of elbows and fittings as much as possible. - Maximize your pumps service life by protecting the motor from the elements by ensuring it is well covered and adequately ventilated.
Exposing your pump to excessive heat or moisture will shorten the life of the motor. - WARNING: Protect the motor against dirt, water, and all foreign matter. If the motor has been flooded, do not operate it until
it has been checked by an authorized motor technician and has been found to be safe to operate. If the motor is damaged by dirt, moisture,
foreign mattre or corrosion it is not covered by the warranty. - Mount the motor to a stable base where it will not get submerged. Use caution when installing in a vault.
Be sure proper drainage is in place to prevent flooding. A sturdy pedestal under the pump is beneficial in a vault application to maximize
space to the ground. Ensure the vault is properly ventilated. - The pump ports are 2” slip on both the inlet and discharge ports. The fittings included with your pump should connect to PVC or flexible PVC
pipe plumbing. All plumbing lines should be self supported and properly aligned. This will prevent undue stress to the housing and fittings.
We recommend using a good primer and PVC cement to glue the pipe to the tailpiece fittings. - Installations in which the water level is elevated above the pump it is highly recommended to use a ball or swing type check valve
to prevent back flow and possible reverse rotation. A ball valve will supplement a swing check valve and allow flow adjustments. - FILL THE PRIMING POT WITH WATER BEFORE STARTING THE PUMP.
- When determining pump placement, it is important to consider the distance and height from the water source. To ensure reasonable
prime time without an inline swing type check valve, position the pump no higher than 9 feet from the water source. Positioning is also
important to maintain the pumps ability to stay primed and minimize cavitation. Do not use spring loaded check valves!
Proper installation of your
EasyPro EXP Self-Priming External Pump
will help ensure years of trouble free service.
Before wiring any part of the motor, be sure the power is disconnected.
It is recommended that wiring be performed by a licensed electrician or professional service person. If pump has a factory pre-installed cord, wiring has already been set and this step is not needed; unless voltage change is required in which case the cord will need to be removed and steps below are followed.
ELECTRICAL STEPS & TIPS
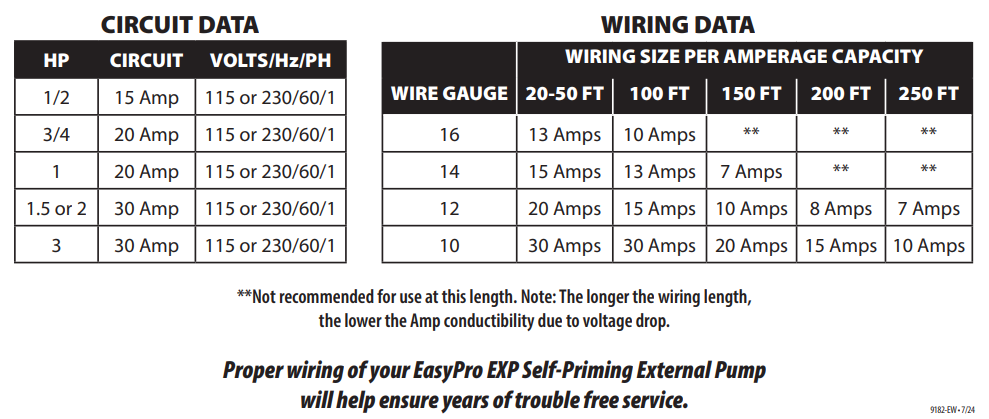
- Inspect the internal wiring of the motor to ensure voltage supply is matched between the motor and the power source. If voltage does not match,
it will damage the motor and void the warranty.
EXAMPLE: If connecting your pump to a 115v circuit, make sure the motor connections match the 115v wiring diagram listed on your particular model. - Supply voltage must be within +/- 10% of nameplate voltage indicated on the motor. Incorrect voltage supply may result in fire or damaged motor
and voids the warranty. If you are not certain, please consult with a licensed electrician. - Use designated supply wire size specified in the charts below. Correct wire size is necessary to avoid electrical insufficiencies, allowing the motor to
run cooler, more efficiently and eliminating line voltage loss. It is important to connect your pump to a Ground Fault Circuit Interrupter (GFCI) for safety. - Wire motor following the connection diagram located on the motor. Note differences in high and low voltage arrangements. If a cord has been
pre-installed the connection was completed at the factory. - Be sure all connections are clean and tight. Ensure the motor is properly grounded. Typically a green ground terminal is located inside the motor
connection box. The ground wire must be properly connected to an electrical service ground to safely operate. - The pump must be connected to an adequately sized circuit. It is recommended to have a dedicated circuit that will prevent voltage drop from other
loads as occurs on shared circuits.
Understanding Priming & Pump Operation
for EXP4000, EXP5500, EXP6500, EXP7500, EXP6500HP, EXP9500HP
Proper start up and operation of your EasyPro
EXP Series Self-Priming External Pump will help
ensure years of trouble free service.
THE BASICS
Your pump is powered by an electric motor that directly affects your water flow rate. When the electric motor is turned on it utilizes centrifugal force to generate velocity of the water. The water then flows into the strainer pot from the water source, filtering out debris.
Water continues its flow into the eye of the impeller where the water meets the impeller vanes and converts kinetic energy into static pressure allowing the pump to maintain pressure and is then forced out of the pumps discharge port resulting in continuous water flow for your waterscape oasis.
WITH VALVE
What to expect for priming cycle with swing check valve installed. Essentially, when utilizing a properly installed swing check valve the priming process is less time consuming and is more efficient. When installing a swing check valve, be sure your connections are properly seated and air tight. Then, simply fill the priming pot with water until the intake plumbing and priming pot are full. Replace the lid, securing tightly and turn on your pump.
With the swing check valve in place your pump is fully primed from the beginning. However, if after running your pump you observe the water level in the strainer pot decreasing continuously, this indicates there is either a blockage limiting the flow or a union fitting, connection on the intake pipe or lid that is not airtight. Check all
connections for debris, crimping, or cracking and re-tighten or replace parts as needed.
THE PRIME
The EXP Series pump is considered a “true” self-priming pump. This means it is designed to prime and operate at varying heights up to 9 feet above the water source surface as well as varying horizontal lengths.
It is important to note that operating at maximum suction lift height may negatively affect the pumps overall performance. If, after starting the pump, you notice it takes more than three (3) minutes for water to start flowing into the priming pot after being filled with water and energized, it is recommended to install a rubber flapper type swing check valve.
The valve should be as low and as close to your source water as possible to maintain constant pressure and shorten prime time. The best location can even be underwater when possible as this can provide an air tight fit even without PVC adhesive.
Some swing check valves have true union connection fittings that offer easier access for cleaning when needed.
Never use a spring loaded check valve as it will reduce or stop flow.
WITHOUT VALVE
What to expect for priming cycle without a swing check valve installed. In installation applications where the pump and plumbing are above the water level and no swing check valve is installed, the priming process will work as listed in the installation instructions. In this application the internal pressure in the pipe drops below outside barometric pressure which allows this pressure to slowly push water toward the pump. This slow push results in a longer priming cycle.
It is important to note that the incoming water flow may initially be very little or non-existent for the first few minutes. If three minutes pass with no water flowing into the priming pot, the pump should be shut off, connections rechecked, water refilled and system restarted.
With a valve or without a valve, the time it takes for your pump to complete the prime cycle is based on a variety of factors including pipe type, diameter, suction lift height, horizontal distance, motor speed and horsepower. The entire cycle can range from one to fifteen minutes to complete; however, as noted above, you should see water flowing into the pump within three minutes or less.
For system specific assessments including suction lift and friction loss guidance and operating questions, please call 800-448-3873 or email info@easypro.com.
Pump Winterization
for EXP4000, EXP5500, EXP6500, EXP7500, EXP6500HP, EXP9500HP
Winterizing your pump is necessary if freezing temperatures occur in your geographic area for extended
periods of time. If freezing temperatures are not common but may on occasion drop below freezing, it is advised to follow winterization procedure to protect your pump.
Freezing temperatures cause water to expand and may
result in damage to the pump, plumbing, and other
connected components resulting in costly repairs.
STEPS FOR WINTERIZATION
Full Disconnection Method:
This method is best for pumps situated outside without protection of a building or a vault
- Disconnect the pump from the power source by unplugging or turning off at the circuit breaker.
NOTE: If hardwired, you may either disconnect the electrical connection (a qualified electrician should perform this) or you leave the motor
connected and disconnect the pump end. If you choose this option, please follow pump disassembly instructions and insulate and cover the motor
for protection. - Close all necessary valves on inlet and discharges lines and drain the pump by removing both drain plugs. As the pump drains, the lid may be loosened
to facilitate better drainage.
Tip: Store drain plugs in a resealable bag and tape the bag to the pump or store inside the pump basket to prevent loss. - Once drained, loosen the intake and discharge ports by turning the union nut counter-clockwise until loose.
- The pump can now be removed. Be sure the pump is fully drained and lid removed before being stored. The lid may stay secured if prior to storage
the lid is removed and fully dried. Store with drain plugs removed. Your pump is now ready for storage in a dry, warm location such as a garage.
**Be sure to drain the water from the plumbing on your system and related components to prevent damage.
Connected Method:
This method is best for pumps situated in a vault, shed or other covered outdoor location that may be difficult to fully remove.
- Follow steps 1, 2, and 3 above.
- Once drained, remove and dry the lid and place over the top without latching.
- Drain all plumbing lines on your system.
- Insulate the pump and exposed pipes, fully covering to prevent moisture intrusion and freezing temperature exposure.
Do not directly cover with plastic sheeting as this can create condensation that can result in damage.
Proper winterization of your
EasyPro EXP Self-Priming External Pump
will help ensure years of trouble free service.