Becker Windmill Tower Hinges allow you to lay the windmill down for repairs, regular maintenance or impending storms to prevent damage. Once your windmill tower has been assembled, you can install the windmill tower hinges. These instructions are for new windmill installations, but previously installed windmills
can also have hinge sets added later.
Danger – Raising and lowering a windmill tower is heavy and should be done with extreme care to avoid injury. Always raise or lower a windmill on calm days with little to no wind.
Helpful Hint – For new installations, do not install the head assembly until you are done with the hinge set.
Kit Includes
Two (2) Hinge Posts
Two (2) Mounting Hinge Plates
Six (6) Bolts
Six (6) Lock Washers
Six (6) Nuts
STEP ONE
After assembling tower section, stand it up on level ground where it is to be installed. Best accomplished with four people.
STEP TWO
With the welded end up, place each of the four ground stake rods through the stake clamp brackets at each corner and pound into the ground.
- a. Leave 5” to 6” of stake above ground.
- b. If your installation is on uneven ground, more stake may be required to be left above ground.
STEP THREE
To install hinge assembly, lift standing tower up off ground stakes and rotate slightly to clear ground stakes. This allows access to the stakes that will get hinges.
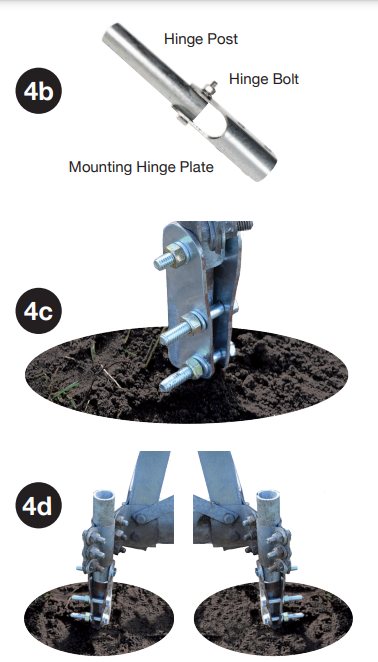
STEP FOUR
On the two corners receiving hinges;
- Cut about 1” to 1½” off the top of the ground stake (i.e. cut off the welded, flared end). This allows mounting hinge plate to fit around ground stake without binding.
- Assemble hinge units by joining hinge post and mounting hinge plate with hinge bolt. Attach lock washer and nut until snug (hand tight is fine), but do not completely tighten yet.
- Slide the mounting hinge plates onto the stakes and install the two lower clamp bolts.
- Be sure the mounting hinge plates are both facing the direction the tower will need to go and tighten lower bolts on hinge plates. The hinge bolt should not be completely tight yet.
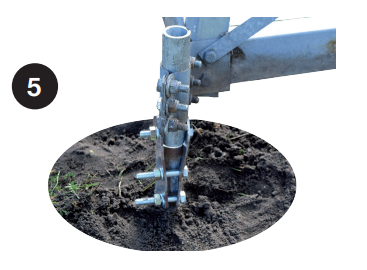
STEP FIVE
Place standing tower back on ground stakes and insert hinge posts in tower clamp brackets.
NOTE If on uneven ground, use boards to nearly level the tower until final leveling and bolt tightening is done. It will be easier to do here than with the weight of the head on the tower.
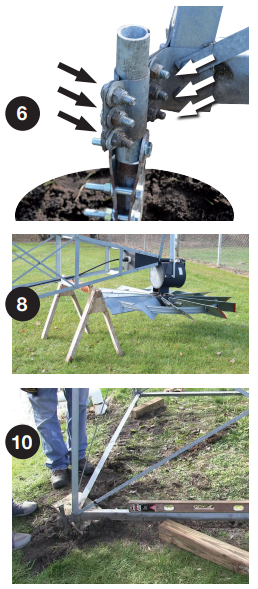
STEP SIX
For the two hinged corners, tighten the six tower clamp bolts securely onto the hinge post.
- This is a good time to check that the mounting hinge plates are positioned correctly. (See step 4d) Adjust position and retighten the lower hinge bolts if needed.
STEP SEVEN
For the two corners without hinges, leave the clamps loose for now.
STEP EIGHT
Utilizing the installed hinges, lower the windmill to the ground. Have a sawhorse (or something similar) to support the tower while you attach the head assembly.
STEP NINE
Once head and airline are installed, raise the tower back up, aligning the non-hinged corners with the ground stakes.
STEP TEN
Level the windmill. Adjust the height of each leg by raising or lowering the hinge plates (2 hinged corners) and/or the stake clamp bracket.
STEP ELEVEN
Once level, securely tighten all bolts including the upper hinge bolts on each hinge plate.
STEP TWELVE
OPTIONAL: You can drill a hole through the stake clamp bracket and hinge post and install another bolt as a preventative measure to prevent the windmill from raising up on the hinge post.