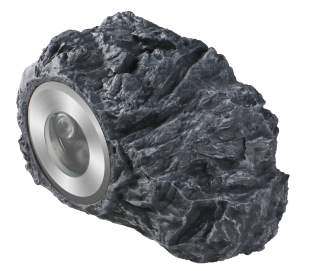
Thank you for purchasing the 4 Watt LED Rock Light from EasyPro.
This light can make your fountain glow, illuminate your pond from within, highlight your waterfall from inside and outside the pond and extend the enjoyment of your water feature into the evening hours. This light may be used outside of the pond as landscape lighting as well. Use of this low voltage light requires a transformer. (not included) Consider EasyPro transformers MT10 (2 lights), MT20 (4 lights) or EPT45 (up to 8 lights).
Safety and Electrical Connections
- Always disconnect the electrical supply before handling, maintaining, repairing or installing any pond equipment.
- Light(s) must be attached to a UL listed transformer. (purchase separately)
- Never hook the lights directly to a 110 volt or higher outlet.
- Connect the transformer to a 110 volt receptacle that is protected by a Ground Fault Circuit Interrupter (GFCI).
- Do not use this product in bathrooms or swimming pools.
- All electrical work must be performed by a qualified technician. Always follow the National Electrical Code (NEC) or the Canadian Electrical Code as well as all local, state and provincial codes. Code questions should be directed to your local electrical inspector. Failure to follow electrical codes and OSHA safety standards may result in personal injury or equipment damage. Failure to follow manufacturer’s installation instructions may result in electrical shock, fire hazard, personal injury or death, damaged equipment, provide unsatisfactory performance and may void manufacturer’s warranty.
Installation
- Before installing the product make sure to check in the box for damaged or missing parts. Contact EasyPro immediately if pieces are missing or damaged.
- Be sure the power is disconnected before installing the lights.
- Place the light in the desired location. There are “flat” spots that allow you to more securely place the light at the desired angle.
- When installing the light cable, run the wire back to the transformer and remove the protective cap off of one of the terminals on the transformer. Insert the two prong plug into the terminal and screw down the nut to make a weather tight seal.
- To connect multiple Rock Lights together in a “daisy chain” formation, you will need a suitable transformer, lighting cable(s) and splitter(s). See back for recommended accessories.
- Install transformer on a timer and enjoy.
LED4RL
Submersible, Bright
4 Watt LED Rock Lights